Customize Header
Header is the part that will be attached to every page of the website. It is the part that shows the logo. Show website menu, contact channels, social media, etc. The methods for customizing the header can be divided into 4 methods as follows.
- How to add header menu
- How to set header layout
- How to customize the design
- How to customize header background
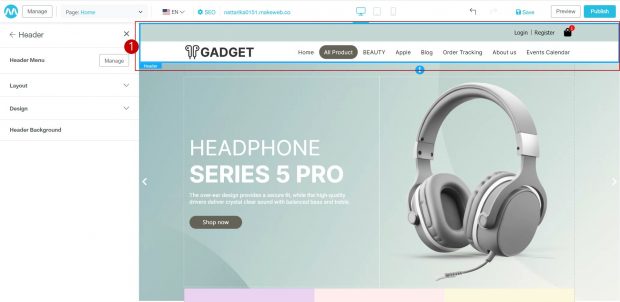
1. How to add header menu
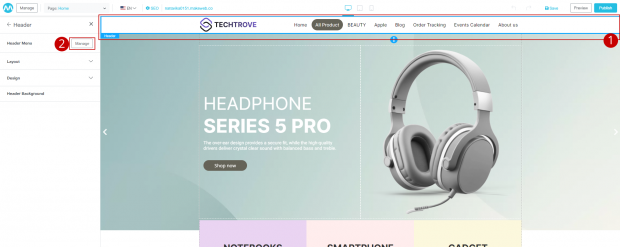
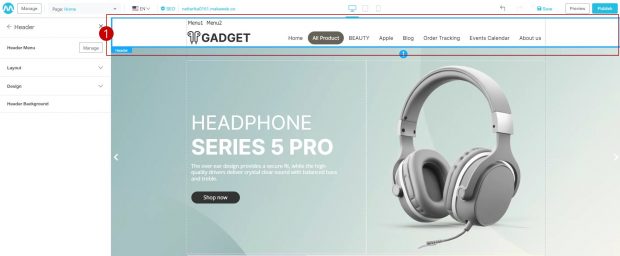
1. Click on “Sections on the website” or click on the menu bar Header. System Will show the Site Settings section on the website.
2. Click on the button “Manage” in header menu
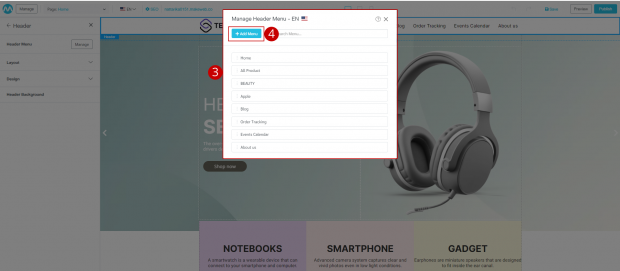
3. Modal display system adds menu
4. Click the button “Add Menu”
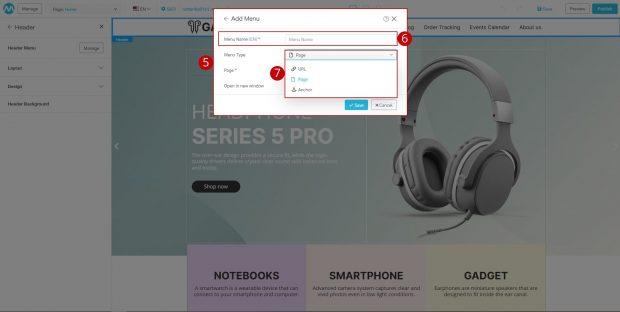
5. The system will display a Modal to add a menu.
6. Set the menu name and choose the type of menu you want
7. Click on the option (Dropdown). The system will display 3 options:
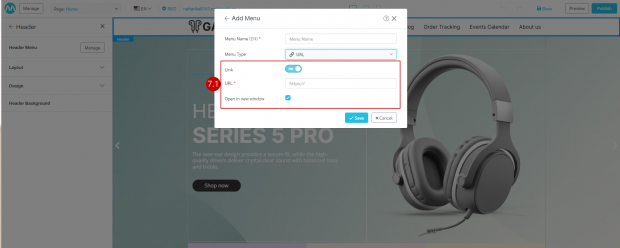
- Link (URL) : Used if the menu is an internal website. Click and the menu will go outside.
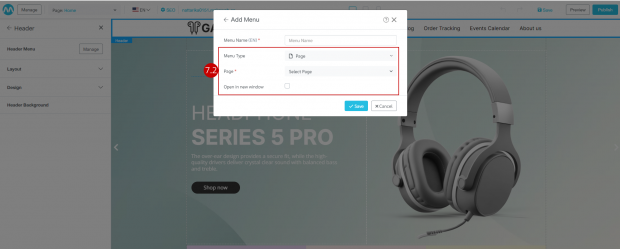
- Page : If the menu has separate page for content, images, either custom design or product system.
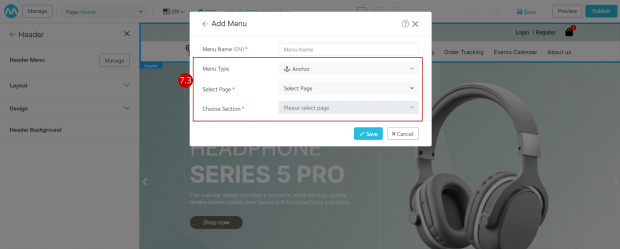
- Anchor : Used in the case where the website is a single page. Select the menu and scroll down to that section. We need to create the page menu and create a section first. When created, there will be an option.
7.1 When selecting “URL” the system will prompt you to fill in link information as shown in the picture
7.2 When selecting “Page” the system will select the page as shown in the picture
7.3 When selecting “Anchor” the system will allow us to select the page and section as shown.
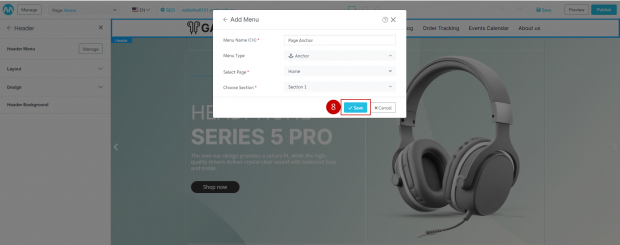
8. Click on the button “Save” The system will display the menu that we created
2. How to set header layout
1. Click on the header menu
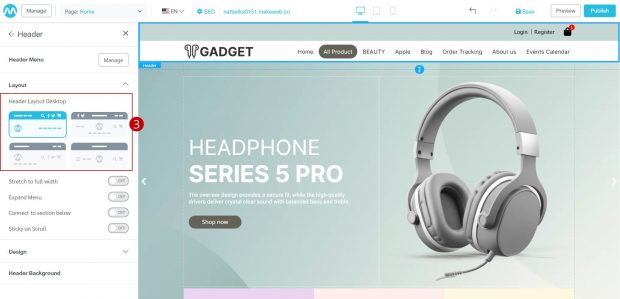
2. Click on the Layout section. The system will display 4 header format
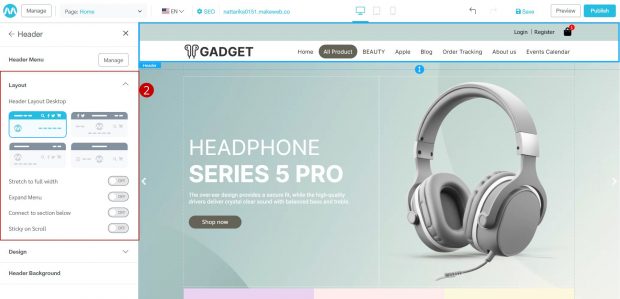
3.Click on “Header layout” (thumbnail) to select the desired menu style
in each form, Users can click on/off settings button. The header menu can be displayed as follows.
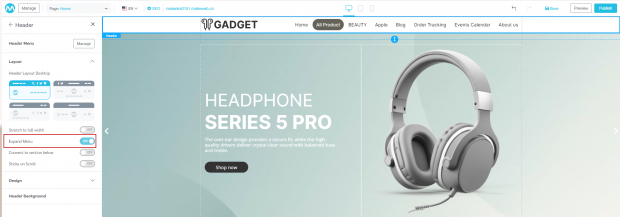
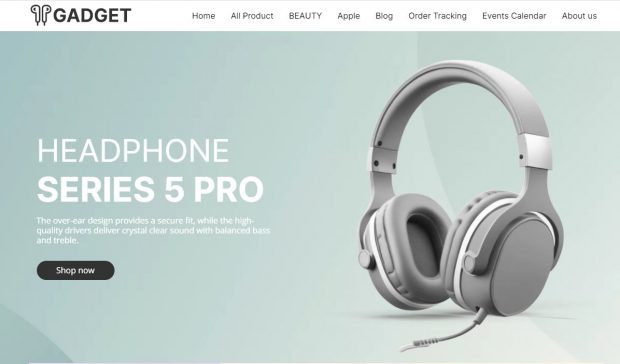
- Stretch to full width: It is the part that makes the top menu stretch to full width
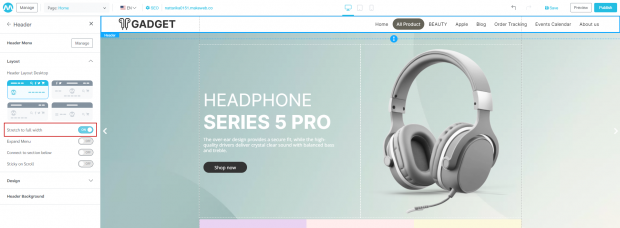

Results in open case “Stretch to full width”
- Expand Menu : Show all menus (no ‘more’ menu)
Open case results “Show all menus” (Expand Menu)
- Connect to section below : Connect the header menu background image to the next section.
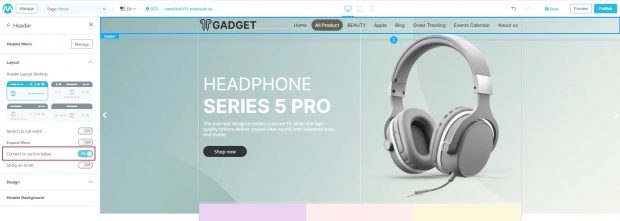
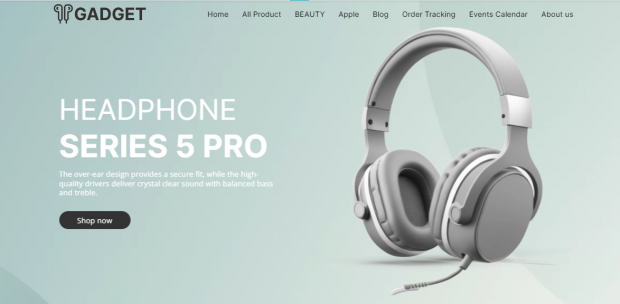
Result of open case “Connected to Section”
- Sticky on Scroll : When the Header bar is opened, the menu will scroll across the web page
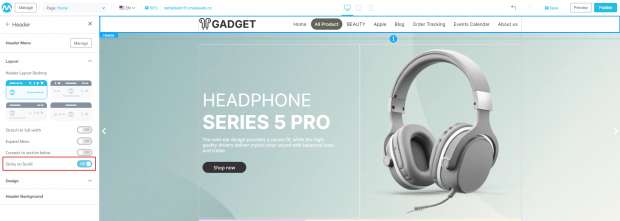

Results in the case of opening “Sticky on Scroll”
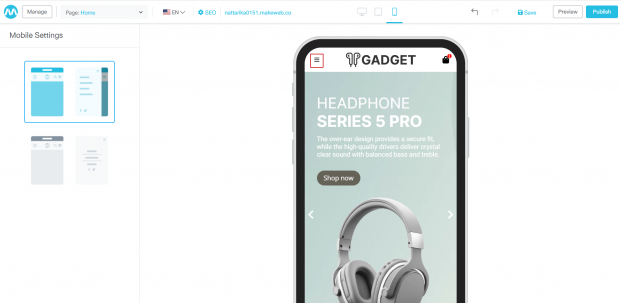
Tips : When the menu is in mobile format, it will be in the form of three lines called “Hamburger menu” You can choose the format in the mobile bar.
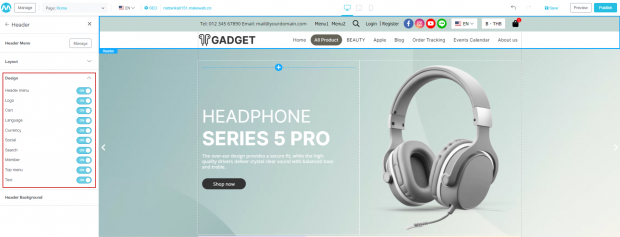
3. How to customize the design
Users can turn on/off Displaying various parts of information on the Heaader can be done by clicking on the tab Header > Design . The system displays opening/closing the information as follows
- Header menu
- Logo
- Cart
- Language
- Currency
- Social media
- Search
- Member
- Top menu
- Text
3.1 How to customize header menu
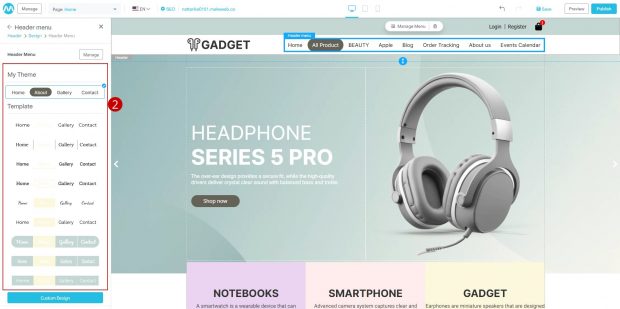
1. Users can click on “Header Menu”
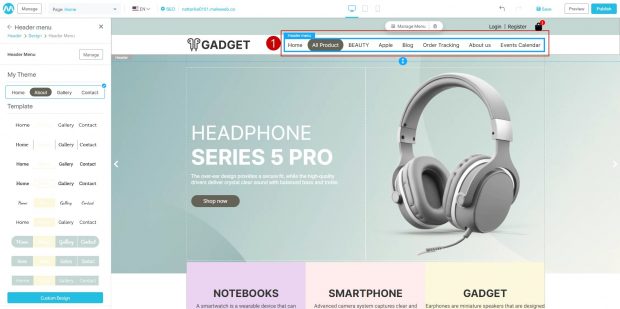
2. The system will display Site Settings on the side, consisting of the current theme (My Theme) and a menu template (Template). The user can choose a style from the template. And you can adjust the design yourself according to item 3.
- The current theme is the menu theme that users are currently using.
- A template is a set of system menu themes.
3. Users can customize the design by clicking on the button “Custom design”
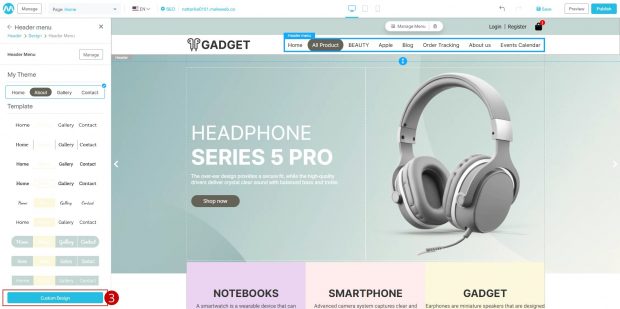
4. The system displays Site Settings in 2 sections.
- The design part is customizing the menu format.
- The text part is to modify the font style, font size, etc.
4.1 Steps for customizing the menu format
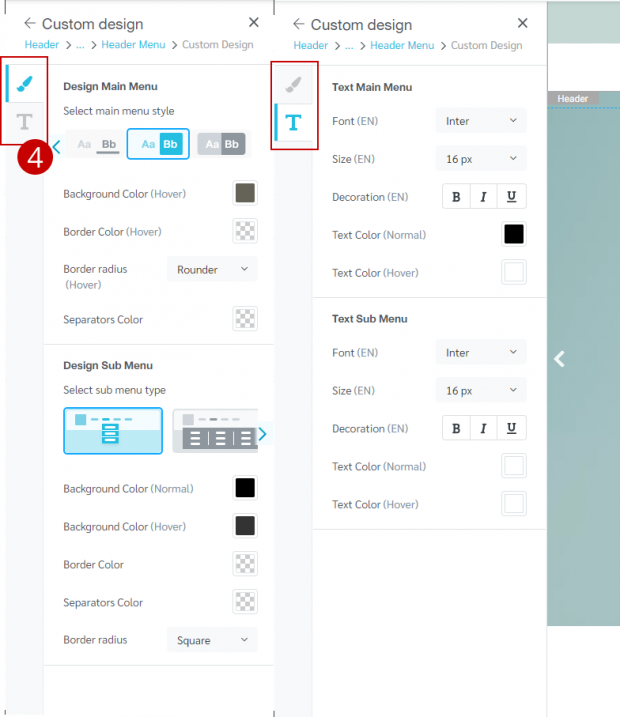
1. Click on the tab “Design” Customizing the main menu format (Design Main Menu) and the secondary menu (Design Sub Menu)
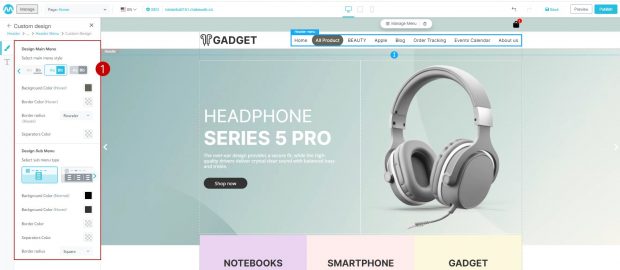
2. Click on “Thumbnail Image” (Layout) Main Menu (Design Main Menu) to change the menu display style

3. Click “Color Box” to customize the background color , border color and menu separator color
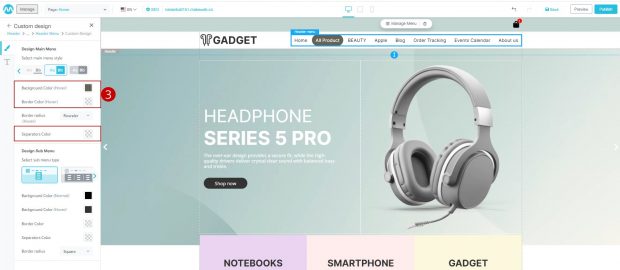
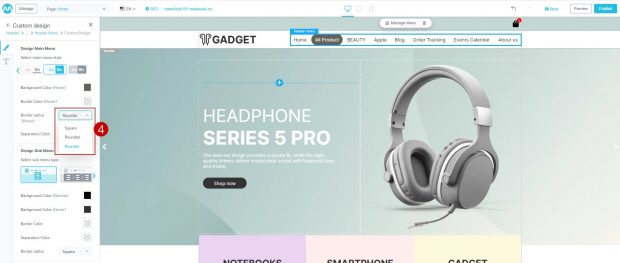
4. Click on the Border Style option (Dropdowns) to select a border style. There are 3 border styles offered by system:
- Square
- Rounded
- Rounder
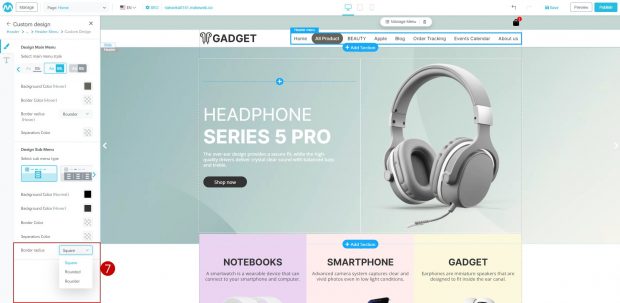
5. Click on “Thumbnail” (Layout) Design Sub Menu to change the menu display style

6.Click on “Color Box” to customize background color and background color

7. Click Border style (Dropdowns) to choose the border style. There are 3 border styles offered by system:
- Square
- Rounded
- Rounder
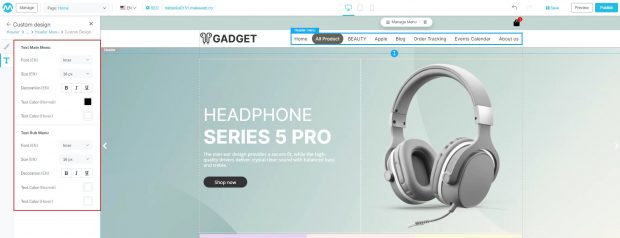
4.2 Steps for customizing Text section
Click on the tab “Text” to change the font style, font size, and font color of the main menu and secondary menu
3.2 How to customize the website logo
1. Click on the logo
2. The system displays Site Settings on the side.

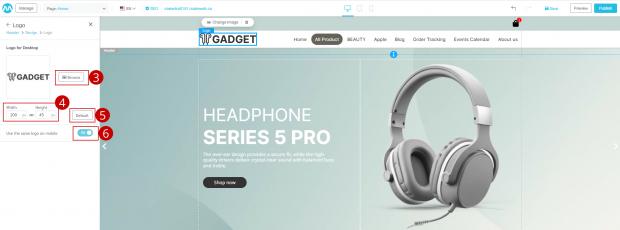
3. Click on the button “Browse” to upload a website logo image
4. You can fill in the image size, width and height as desired.
5. Click on the button “Default” to set the logo as default
6. Turn toggle “On/Off” for set up logo usage on mobile phones
Note : Setting to use the same logo on mobile (Use the same logo on mobile)
- OFF means using a mobile website logo style that is different from the desktop version.
- ON means using the same website logo for both desktop and mobile.
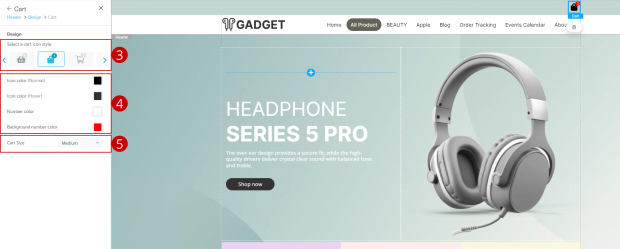
3.3 How to customize the shopping cart
1. Click on the shopping cart icon.
2. The system displays Site Settings on the side.
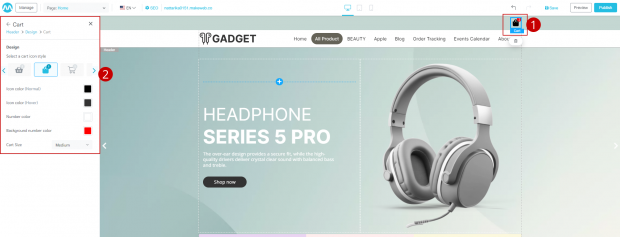
3. You can click on “layout” to select the design of the shopping cart
4. You can click on “Color Box” to set the color of the shopping cart icon. and number colors.
5. Click on the option “Cart Size” to select the size of the shopping cart icon
3.4 How to customize the language (nation) flag
1. Click on the picture of the national flag of the language.
2. The system displays Site Settings on the side.
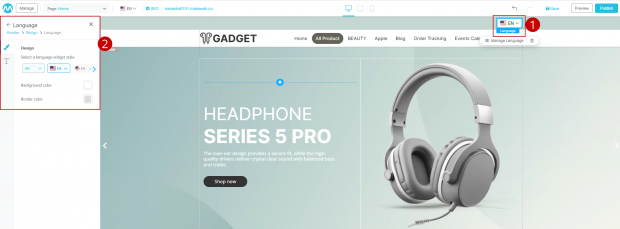
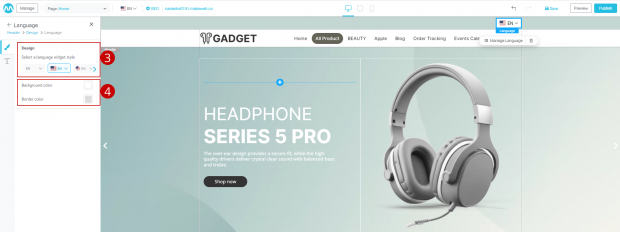
3. You can choose the display format of the language by clicking “Layout”
4. Click on the color box “Color box” To set the background color and the border color
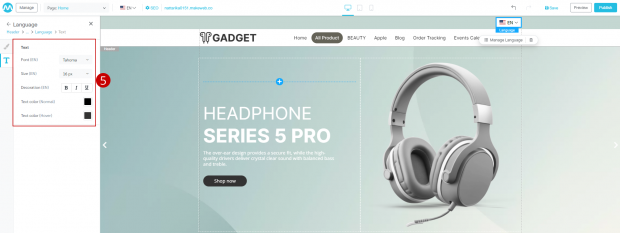
5. Click on the tab “Text” to adjust characters that can be displayed next to the national flag of the language
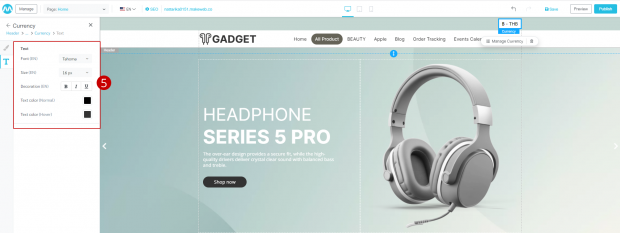
3.5 How to customize the currency format
1 Click on the currency picture.
2. The system displays Site Settings on the side.
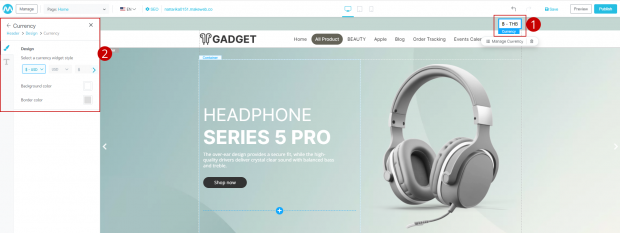
3. Click on “Layout” to select the format. On-demand display
4. Click on “Color Box” to set the background color and border color
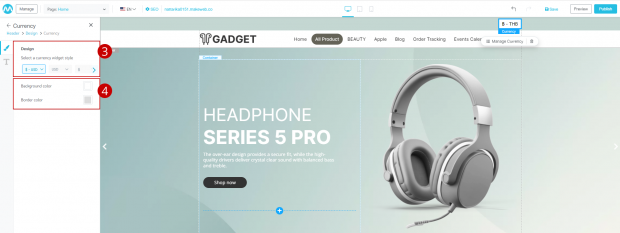
5. Click on the tab “Text” to adjust the font style, size, color of the font both in normal format and Hover
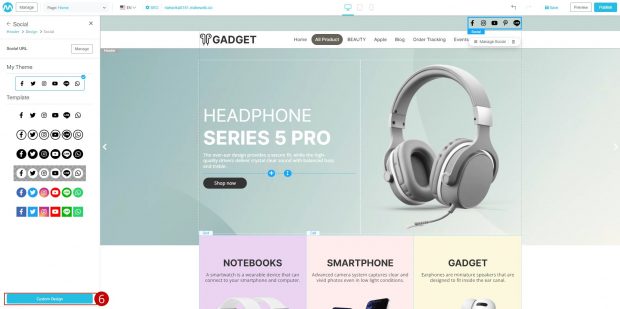
3.6 How to customize social media
1. Click on the social media picture.
2. The system displays Site Settings on the side, showing details as follows.
- Social URL)
- My Template is the social theme currently used by users
- Template is the system’s social theme set
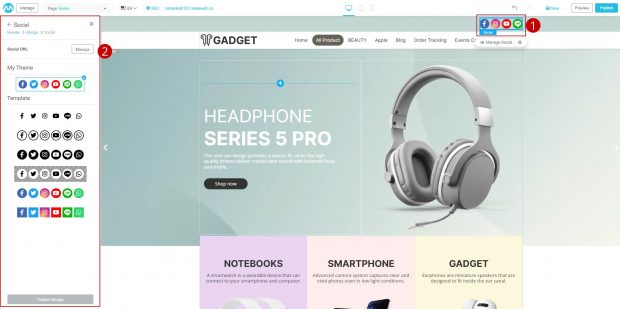
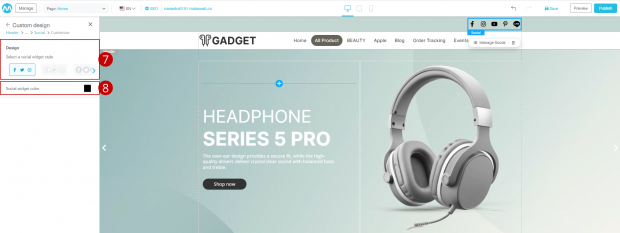
3. Click on the button “Manage”
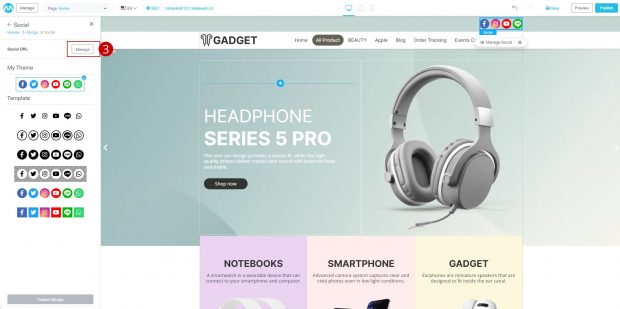
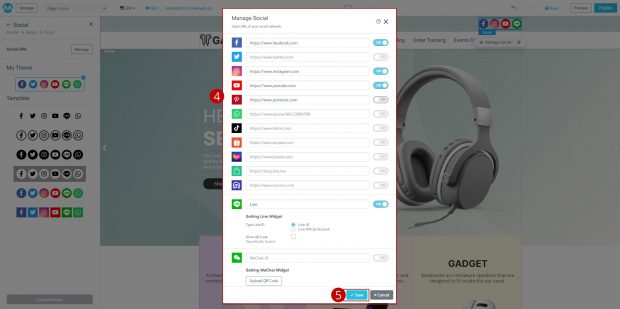
4. The system shows Modal Settings open. and turn off social media display Users can enter the website’s contact link.
5. When clicking on the button “Save” the system displays social media photos in the upper menu section
6. Users can choose the design of social widgets from the template provided by the system. If you want to design it yourself, click on the button “Custom Design”.
7. Users can click on “Layout” to choose a social format according to your needs
8. Click on “Color Box” to set the icon color (Social widget color)
3.7 How to customize the search button style
1. Click on the magnifying glass icon.
2. The system displays Site Settings on the side.
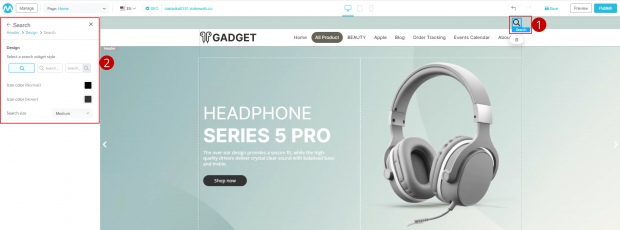
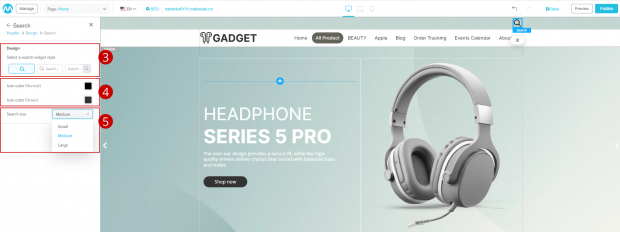
3. Click on “layout” to select the display format as desired
4. Click on “Color Box” To set the colors of the various sections in the search box
5. Click on the option “Search size” to set the size of the search box.
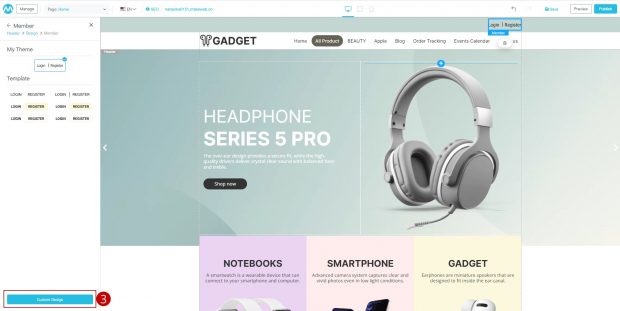
3.8 How to customize the membership button style
1. Click on “Login | Register”
2. The system displays Site Settings on the side.
- The current theme is the member button style theme currently used by users.
- Template is a set of system member button themes.

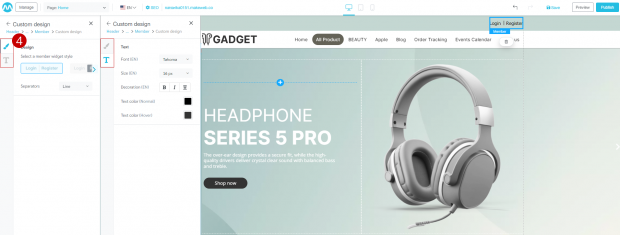
3. If you want a design member button, Click on the button “Custom Design”
4. The system displays Site Settings in 2 sections.
- The design part is customizing the membership button style.
- The text part is to modify the font style, font size, etc.
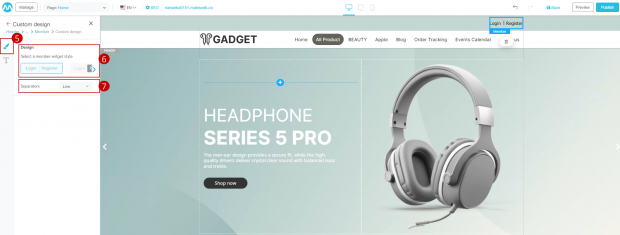
5. Click on the tab “Design” to customize the member button style.
6. Click on “Layout” to select the member button display format as desired.
7. Click on the option “Separators” to set the separator format
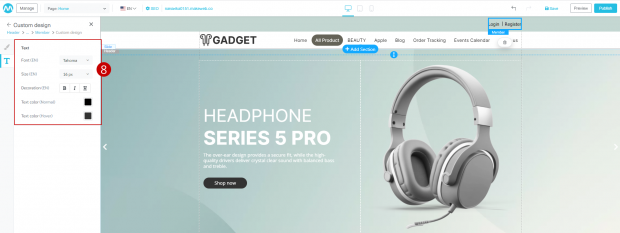
8. Click on the tab “Text” to customize the font style, size, and color of the font both in normal format and when hovering with the mouse.
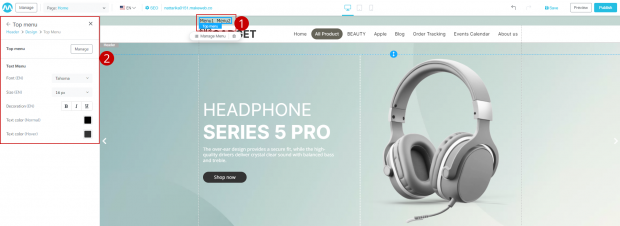
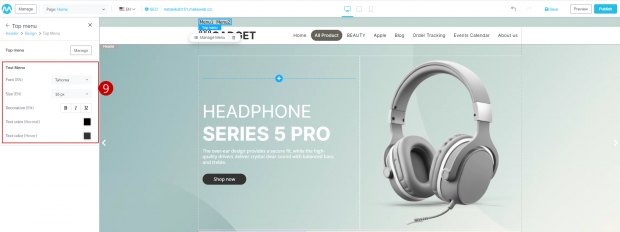
3.9 How to customize the top menu
Top menu is the menu located at the top of the website. Most are pages or other sub-menus that you want website visitors to see. Users can choose the font, size, font style, and color. You can also add or manage the top menu by yourself by customizing the top menu bar format as follows.
1. Click on the menu “Top menu”
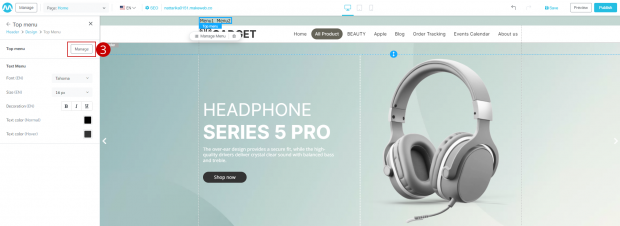
2. System shows Site Settings on the side by showing header menu and character customization and color
3. Click on the button “Manage” to add menu to top bar
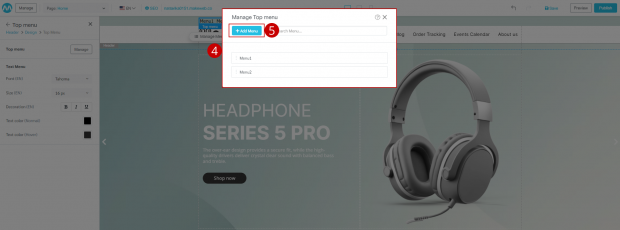
4. The system displays Modal Add Top Menu
5. When clicking the button “Add Menu”
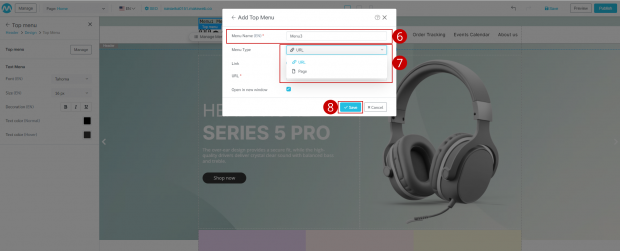
6. Set the menu name and choose the type of menu you want
7. Click on the option (Dropdown). The system will display 2 options:
- Link (URL)
- Page
8. Click on the button “Save” The system will display the menu that we created
9. Users can customize the font style, font size and font color as shown in the picture
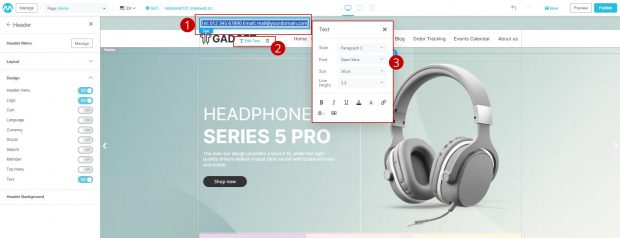
3.10 How to customize the text format
1. Click on “Text” on the top menu bar. to change the text
2. Click on the button “Edit Text”
3. Modal display system to customize the design of the message. Users can customize the font style, font size as desired
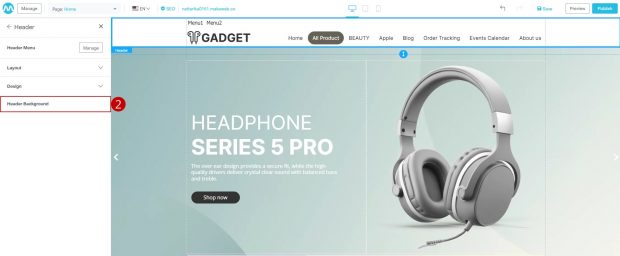
4. How to customize the header background
Users can customize the upper background in 2 parts:
- Header Background
- Top Bar Background
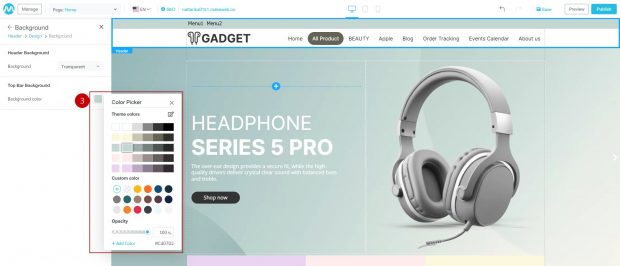
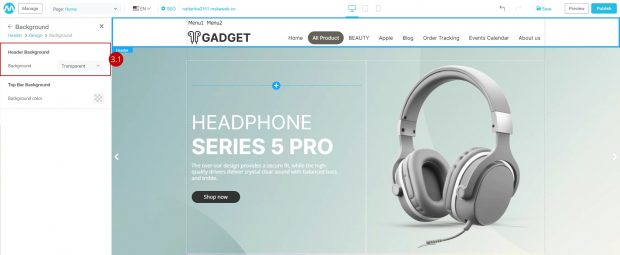
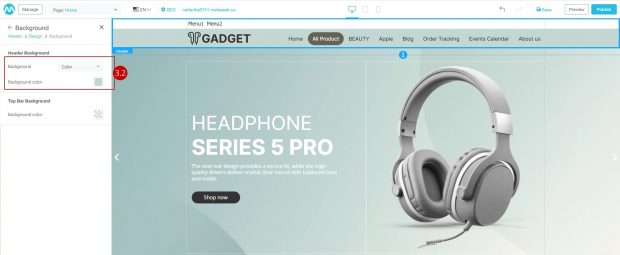
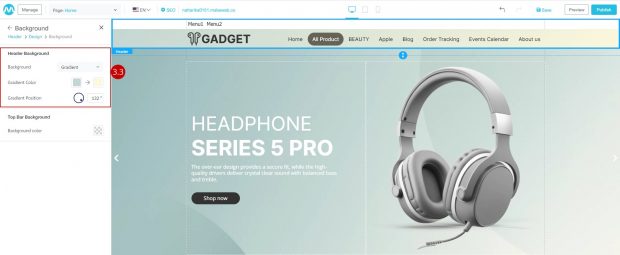
4.1.Header Background
- Click on the tab “Header Menu”
2. Click on the tab “Header Background”
3. The Modal display system allows you to choose from 3 background formats:
3.1 Transparent : Transparent background will become the background color of the website that we have selected
3.2 Color : Background color Users can choose the color they want by clicking on the color box
3.3 Gradient : Gradient background Can choose 2 colors and choose Gradient Position as desired
4.2 Top Bar Background
1. Click on the tab “Header Menu”
2. Click on the tab “Header Background”
3. Click on “Color Box” to set the color of Top Bar section or the top bar of the website